Lemon Cream Cheese Dump Cake – Bright, Tangy, and Incredibly Easy
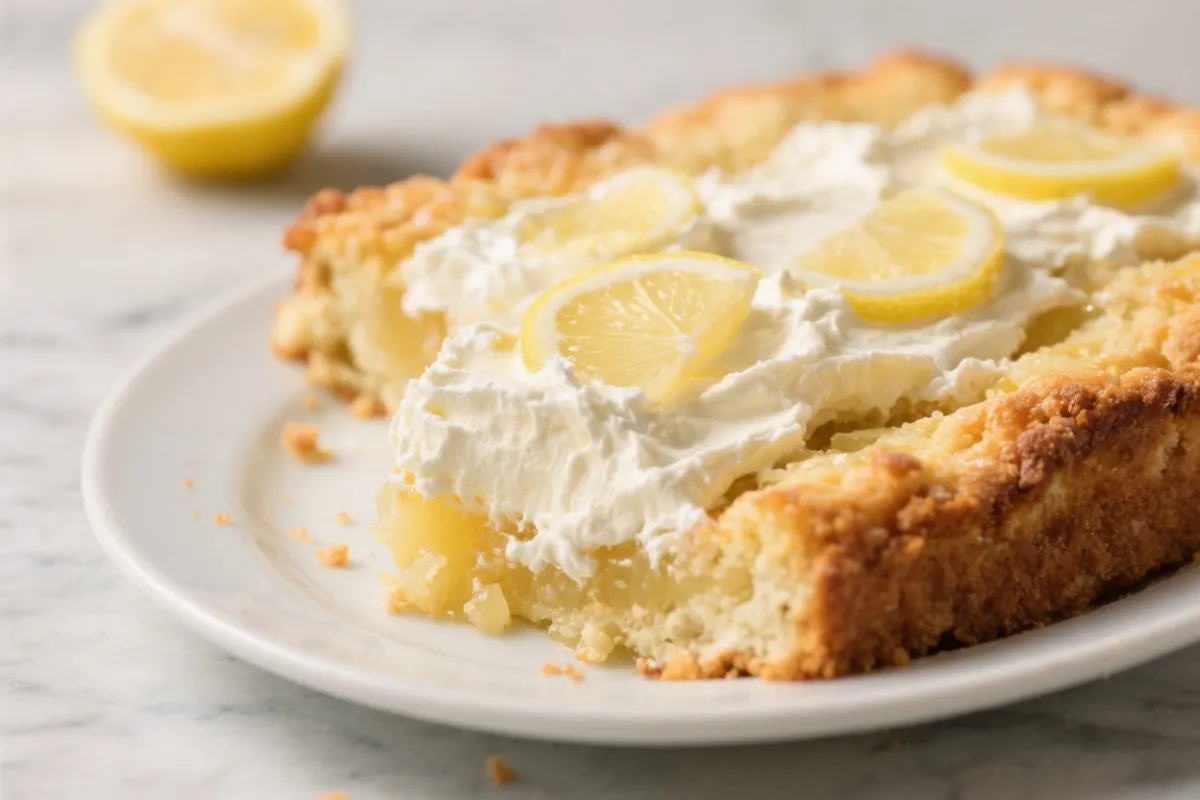
A good dessert doesn’t have to be complicated, and this Lemon Cream Cheese Dump Cake proves it. It’s bright, tangy, and creamy with almost no effort required. If you can open a few packages and spread things in a pan, you can make this cake.
It’s perfect for last-minute gatherings, lazy weekend baking, or when you just want something sunny and sweet without spending hours in the kitchen. Expect a golden, buttery top, pockets of lemony filling, and a rich cream cheese layer that tastes like cheesecake met cobbler.
What Makes This Special
This recipe is the dessert equivalent of a good mood. The lemon brings a clean, zesty punch that balances the sweetness, while the cream cheese adds a velvety, cheesecake-like richness.
The cake mix bakes into a crisp, buttery crust that contrasts beautifully with the soft, gooey filling underneath.
It’s also wonderfully forgiving. You don’t need a mixer, special skills, or exact measurements down to the gram. Everything gets layered or “dumped” into a baking dish, and the oven does the rest. It’s the kind of recipe you’ll make once and then keep in your back pocket for years.
Shopping List
- 1 box yellow cake mix (15.25 ounces is standard)
- 2 cans lemon pie filling (about 21 ounces each)
- 8 ounces cream cheese, softened
- 1/2 cup granulated sugar
- 1 teaspoon vanilla extract
- 1/2 cup unsalted butter, melted (plus extra pats if you like more crisp spots)
- 1 tablespoon fresh lemon zest (optional but recommended)
- Pinch of salt
- Nonstick spray or butter for the pan
- Optional toppings: whipped cream, powdered sugar, or fresh berries
Instructions
- Preheat and prep: Heat your oven to 350°F (175°C).
Lightly grease a 9×13-inch baking dish with nonstick spray or butter.
- Lay down the lemon: Spread the lemon pie filling evenly across the bottom of the dish. Sprinkle on the lemon zest if using for extra brightness.
- Whip the cream cheese layer: In a bowl, beat the softened cream cheese with the sugar, vanilla, and a pinch of salt until smooth. Dollop this mixture over the lemon layer in spoonfuls.
It doesn’t have to be perfect—little pockets are great.
- Add the cake mix: Evenly sprinkle the dry cake mix over everything. No stirring. Aim for a level blanket of mix without thick mounds.
- Finish with butter: Drizzle the melted butter slowly and evenly across the surface.
Try to cover as much dry mix as possible. If you like, add a few small pats of butter over any dry spots.
- Bake: Place in the oven and bake for 35–45 minutes. You’re looking for a golden, crisp top and bubbling edges.
The center should be set but still a little soft underneath.
- Cool slightly: Let the cake sit for 10–15 minutes. It will firm up a bit as it cools, making scooping easier.
- Serve: Spoon into bowls and serve warm, at room temperature, or chilled. Top with whipped cream or a dusting of powdered sugar, and add berries if you want a fresh pop.
Storage Instructions
Store leftovers covered in the fridge for up to 4 days.
The top will soften, but the flavors meld beautifully. For longer storage, freeze portions in airtight containers for up to 2 months. Thaw in the fridge overnight.
To reheat, warm in the microwave in short bursts until just heated through, or use a 300°F (150°C) oven for 10–15 minutes to refresh the top a bit.
Health Benefits
This is a dessert, so it’s more about joy than nutrition, but there are a few small wins.
Lemon provides vitamin C and a bright flavor that helps you feel satisfied with a smaller portion. The cream cheese adds protein and calcium, which makes the dessert a little more filling.
If you’re looking to lighten it up, consider some gentle tweaks. Use reduced-fat cream cheese, cut the sugar in the cream cheese layer to 1/3 cup, and serve with fresh berries for extra fiber and antioxidants. Portioning into small ramekins can also help with mindful serving sizes.
Common Mistakes to Avoid
- Dry patches on top: If the butter doesn’t cover the cake mix well, you’ll get powdery spots.
Drizzle slowly and evenly. Add a few butter pats to any dry areas.
- Overbaking: The top should be golden and crisp, but the filling underneath should still be soft. If you bake until the center is fully firm, it can turn tough.
- Cold cream cheese: Using cream cheese straight from the fridge leads to lumps.
Soften it at room temperature for 30–45 minutes first.
- Too much stirring: Don’t mix the layers. Dump cakes work because of distinct textures—gooey filling, creamy pockets, and a crisp top.
- Wrong pan size: A smaller pan will make the layers too thick and underdone in the middle. Stick to a standard 9×13-inch dish.
Alternatives
- Cake mix swaps: Try white cake mix for a lighter flavor, lemon cake mix for extra zing, or vanilla for a mellow, bakery-style finish.
- Fruit variations: Add a cup of blueberries or raspberries over the lemon filling before the cake mix.
They bake into juicy pockets.
- Dairy tweaks: Use reduced-fat cream cheese for a lighter texture. For a richer taste, swirl in 1/3 cup sour cream with the cream cheese mixture.
- Gluten-free: Use a gluten-free yellow cake mix. Check your pie filling and vanilla for gluten-free labeling to be safe.
- Dairy-free idea: Use a dairy-free cream cheese and a plant-based butter.
The texture will be slightly different but still delicious.
- Topping options: Finish with a lemon glaze (powdered sugar + lemon juice) once cooled for extra shine and tang.
FAQ
Can I make this ahead?
Yes. Bake it, cool it, and refrigerate for up to 24 hours. Reheat gently in the oven at 300°F until warmed through, or serve chilled for a cheesecake-cobbler vibe.
Do I need to soften the cream cheese?
Yes.
Softened cream cheese blends smoothly and spreads more evenly. If you forget, microwave it in 10-second bursts until just pliable, not melted.
Can I use lemon curd instead of pie filling?
You can, but it’s richer and more intense, so mix lemon curd with a little jarred or canned lemon pie filling, or add a cup of applesauce to balance sweetness and texture.
Why is my top still floury?
That means the butter didn’t reach all areas. Add a few more melted butter drizzles or dot with butter pats next time.
You can also lightly mist the top with cooking spray before baking to help moisten dry spots.
How do I know it’s done?
The edges will bubble, and the top will be golden and crisp. A toothpick won’t work here because of the gooey layers. Start checking at 35 minutes and pull it when the center no longer looks wet.
Can I reduce the sugar?
Yes.
Drop the sugar in the cream cheese layer to 1/3 cup or even 1/4 cup if your pie filling is very sweet. The lemon flavor will still shine.
What should I serve it with?
Lightly sweetened whipped cream is perfect. Vanilla ice cream works if serving warm, and fresh berries add a bright, fresh contrast any time.
Will this work in a slow cooker?
It can.
Grease the slow cooker, layer as directed, and cook on High for 2 to 2.5 hours with a towel under the lid to catch moisture. The top won’t be as crisp, but the flavor is great.
Can I halve the recipe?
Yes. Use an 8×8-inch pan, half the ingredients, and bake for 30–40 minutes.
Keep an eye on the top for color and the edges for bubbling.
Is fresh lemon juice necessary?
No, but a bit of zest lifts the flavor beautifully. If you like things extra tart, add 1–2 teaspoons of lemon juice to the cream cheese mixture.
Final Thoughts
Lemon Cream Cheese Dump Cake is the kind of dessert that makes people smile. It’s simple, bright, and feels special without any fuss.
With its tangy lemon filling, creamy pockets of cheesecake, and buttery, golden top, it hits every texture and flavor note. Keep a box of cake mix and a couple cans of lemon pie filling on hand, and you’re never far from a warm, crowd-pleasing treat. Serve it your way—warm, chilled, plain, or dolled up—and enjoy every sunny bite.
Ingredients
Method
- Preheat and prep: Heat your oven to 350°F (175°C). Lightly grease a 9x13-inch baking dish with nonstick spray or butter.
- Lay down the lemon: Spread the lemon pie filling evenly across the bottom of the dish. Sprinkle on the lemon zest if using for extra brightness.
- Whip the cream cheese layer: In a bowl, beat the softened cream cheese with the sugar, vanilla, and a pinch of salt until smooth. Dollop this mixture over the lemon layer in spoonfuls. It doesn’t have to be perfect—little pockets are great.
- Add the cake mix: Evenly sprinkle the dry cake mix over everything. No stirring. Aim for a level blanket of mix without thick mounds.
- Finish with butter: Drizzle the melted butter slowly and evenly across the surface. Try to cover as much dry mix as possible. If you like, add a few small pats of butter over any dry spots.
- Bake: Place in the oven and bake for 35–45 minutes. You’re looking for a golden, crisp top and bubbling edges. The center should be set but still a little soft underneath.
- Cool slightly: Let the cake sit for 10–15 minutes. It will firm up a bit as it cools, making scooping easier.
- Serve: Spoon into bowls and serve warm, at room temperature, or chilled. Top with whipped cream or a dusting of powdered sugar, and add berries if you want a fresh pop.
Printable Recipe Card
Want just the essential recipe details without scrolling through the article? Get our printable recipe card with just the ingredients and instructions.